Excel is a powerful spreadsheet application that can be used to store and organize data. However, it can be difficult to use Excel to automate tasks or integrate with other applications. XML is a markup language that can be used to represent data in a structured way. Tally is an accounting software application that can be used to manage financial data.
If you're using Excel to store accounting data, you may want to consider converting your data to XML. This will make it easier to automate tasks, integrate with other applications, and import your data into Tally.
At taxone.vyapar.com, we help businesses automate their accounting tasks. One of the ways we do this is by allowing businesses to directly upload and transfer the data from their Excel files to Tally!
In this blog post, we'll show you how to do this yourself, step by step. We'll also explain what Excel, XML, and Tally are, and why you might want to convert your Excel data to XML.
And in the end, we’ll provide you with a secret on how you can transfer your Excel data right into Tally without converting it into an XML file. 💯
Let’s begin!
Understanding the Need for Excel to XML Conversion
Why Converting Excel Data to XML is Necessary for Tally Compatibility
Let's dive into the world of Excel and Tally compatibility! You know how we sometimes have to adjust our speech to make sure someone understands us? Well, that's exactly what happens when we convert Excel data into XML for Tally.
Tally is an accounting software, and it has its own preferred way of understanding data – it's called XML. Excel, on the other hand, speaks in rows and columns. So, when we want Tally to understand what's going on in our Excel sheets, we need to transform the data into XML format. It's like translating between two friends who speak different languages!
Also Read: Workflow Automation Best Practices for Your Accounting Toolbox
Advantages of Using XML Format for Structured Data Exchange
Now, let's chat about why XML format is the go-to choice when we're talking about structured data exchange:
- Perfect Organisation: Imagine putting all your clothes in labelled drawers – that's exactly what XML does for data. It neatly organises information into tags (like digital labels) that Tally can easily read.
- Future-Friendly: Think of XML as a reliable recipe that doesn't change, no matter how many times you use it. Tally might upgrade, but XML stays the same. So, our data translation remains consistent over time.
- Accuracy First: Just like you want your favourite song lyrics to be sung correctly, XML ensures your data is interpreted accurately by Tally. No misunderstandings or misinterpretations here!
- Sharing Made Easy: You know how you share a fun video with your friends? XML files are just as easy to share between software. Tally or any other software that speaks XML will get what you're saying.
So, by converting Excel to XML, we're basically making sure that Tally gets a crystal-clear picture of what we're trying to say. XML acts as the bridge between our Excel data and Tally's language.
Also Read: Don't Get Caught Off Guard! A Comprehensive Guide to Excise Duty Management with the ECC System in India
How to Convert Excel to XML for Tally Using a Tool
To convert Excel data to XML for Tally, you can use a free online tool like Aspose Products. Just follow these steps:
- Go to the Aspose Products website and click on the "Excel to XML" converter.
- Upload your Excel spreadsheet.
- Choose the output format.
- Click on the "Convert" button.
The converter will then convert your Excel spreadsheet to XML. You can download the XML file to your computer.
Once you have the XML file, you can import it into Tally. To do this, follow these steps:
- Open Tally.
- Go to the "Gateway of Tally" window.
- Click on the "Import" button.
- Select the "XML" option.
- Browse to the XML file that you downloaded.
- Click on the "Open" button.
Tally will then import the XML file. The data from your Excel spreadsheet will be added to the relevant Tally tables.
Here is an example of how to convert an Excel spreadsheet to XML for Tally. Let's say you have an Excel spreadsheet that contains a list of customers. The spreadsheet has the following columns:
- Customer Name
- Customer Address
- Customer Phone Number
To convert this spreadsheet to XML for Tally, you would follow these steps:
- Go to the Aspose Products website and click on the "Excel to XML" converter.
- Upload your Excel spreadsheet.
- Choose the output format as "Tally XML".
- Click on the "Convert" button.
The converter will then convert your Excel spreadsheet to XML. The output XML file will have the following structure:
You can then import this XML file into Tally.
<Customers>

 <Customer>

   <CustomerName>ABC Company</CustomerName>

   <CustomerAddress>123 Main Street, Anytown, CA 12345</CustomerAddress>

   <CustomerPhoneNumber>123-456-7890</CustomerPhoneNumber>

 </Customer>

 <Customer>

   <CustomerName>XYZ Corporation</CustomerName>

   <CustomerAddress>456 Elm Street, Anytown, CA 12345</CustomerAddress>

   <CustomerPhoneNumber>987-654-3210</CustomerPhoneNumber>

 </Customer>

</Customers>
Additional tips:
- If your Excel spreadsheet contains a lot of data, it may take some time to convert it to XML.
- Make sure that your Excel spreadsheet is formatted correctly before you convert it to XML.
- If you are having trouble converting your Excel spreadsheet to XML, you can try using a different converter. There are many free and paid converters available online.
- Once you have converted your Excel spreadsheet to XML, you can import it into Tally and start using it to manage your business data.
How to Transfer Data from Excel to Tally Without Converting into XML
Wonder if you can just use your Excel file and have tally catch up all the data automatically without going through any manual data entry or converting files to XML? Well, we might just have the solution for you!
Vyapar TaxOne is an accounting automation tool that connects with Tally and enables you to transfer data straight from Excel to tally through its interface. Let us show you how.
Transfer Data From Excel to Tally Using Vyapar TaxOne
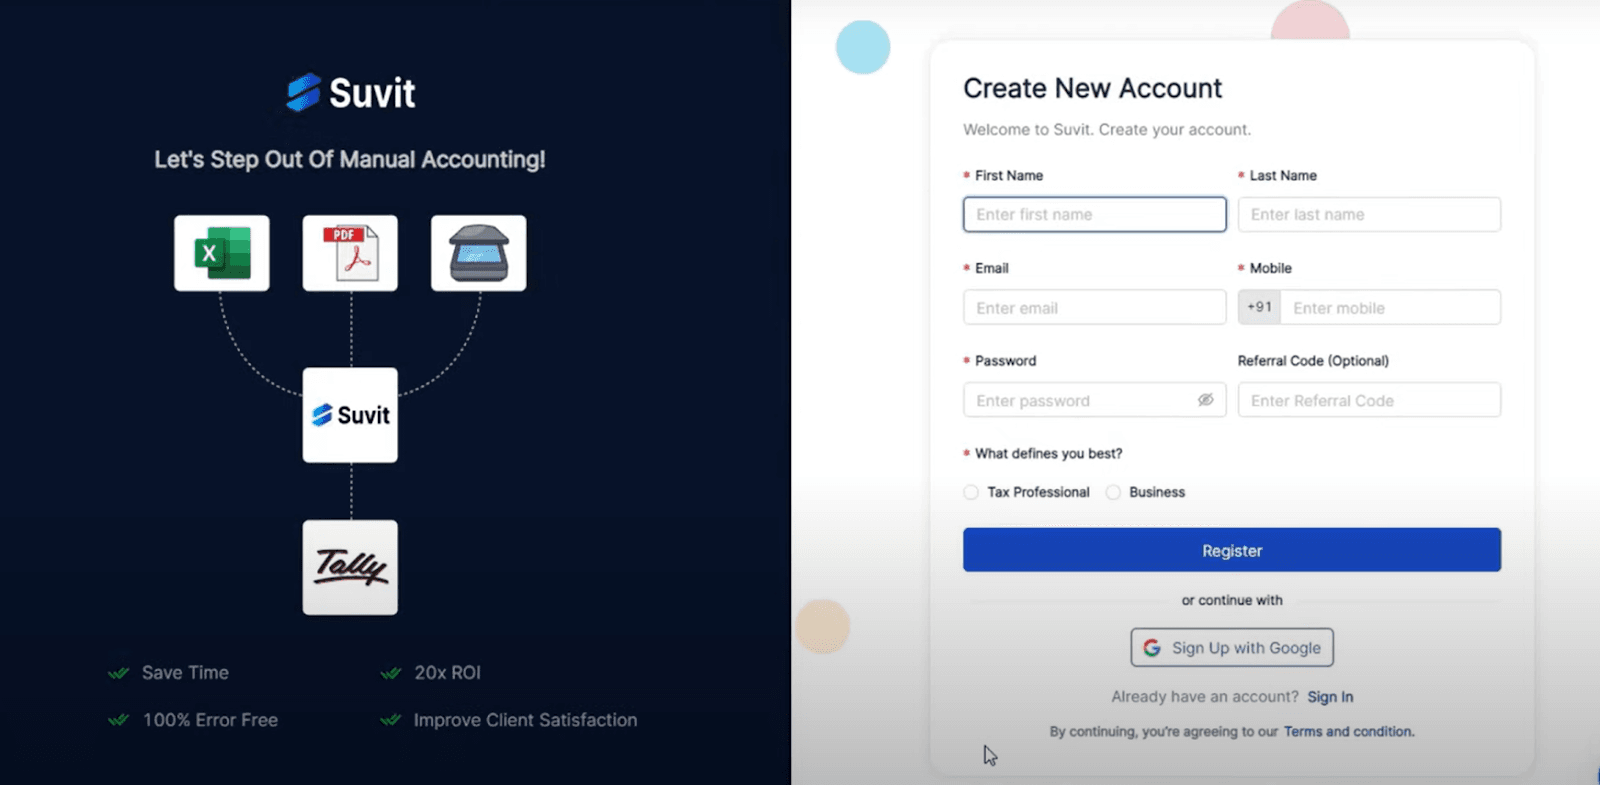
Step 1: Download and Install Vyapar TaxOne
To kickstart your data migration adventure, you'll have to download and set up the Vyapar TaxOne application. Visit our official website and sign up for an account. The installation procedure is designed to be easy for users and prepares you for a smooth and hassle-free journey ahead.
Step 2: Choose a Subscription
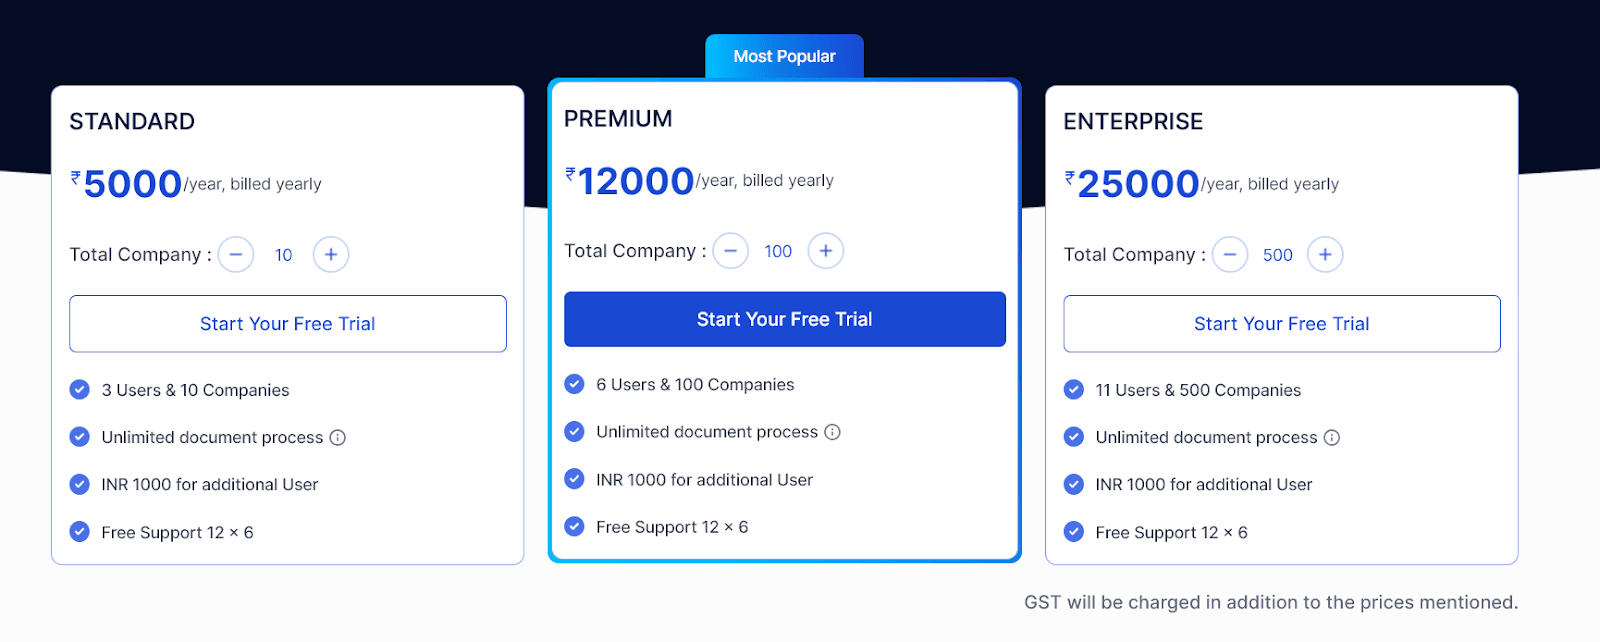
Once Vyapar TaxOne is installed, it's time to select a subscription plan that suits your needs. Vyapar TaxOne offers various options, each packed with unique features. You can even start with a 7-day free trial to get a taste of what it can do.
Step 3: Connect with Tally and the Internet
With your subscription in place, the next step is to establish a connection between Vyapar TaxOne and your Tally software. Vyapar TaxOne ensures a secure link to Tally, making data transfer hassle-free. Also, ensure your computer has a stable internet connection for a smooth migration process.

Step 4: Prepare Exported Data from Excel
Before starting the migration process, make sure you have your data exported from Excel in either an Excel or PDF format. This exported data will be the foundation for the upcoming import into Tally via Vyapar TaxOne.
Step 5: Select the Right Module in Vyapar TaxOne
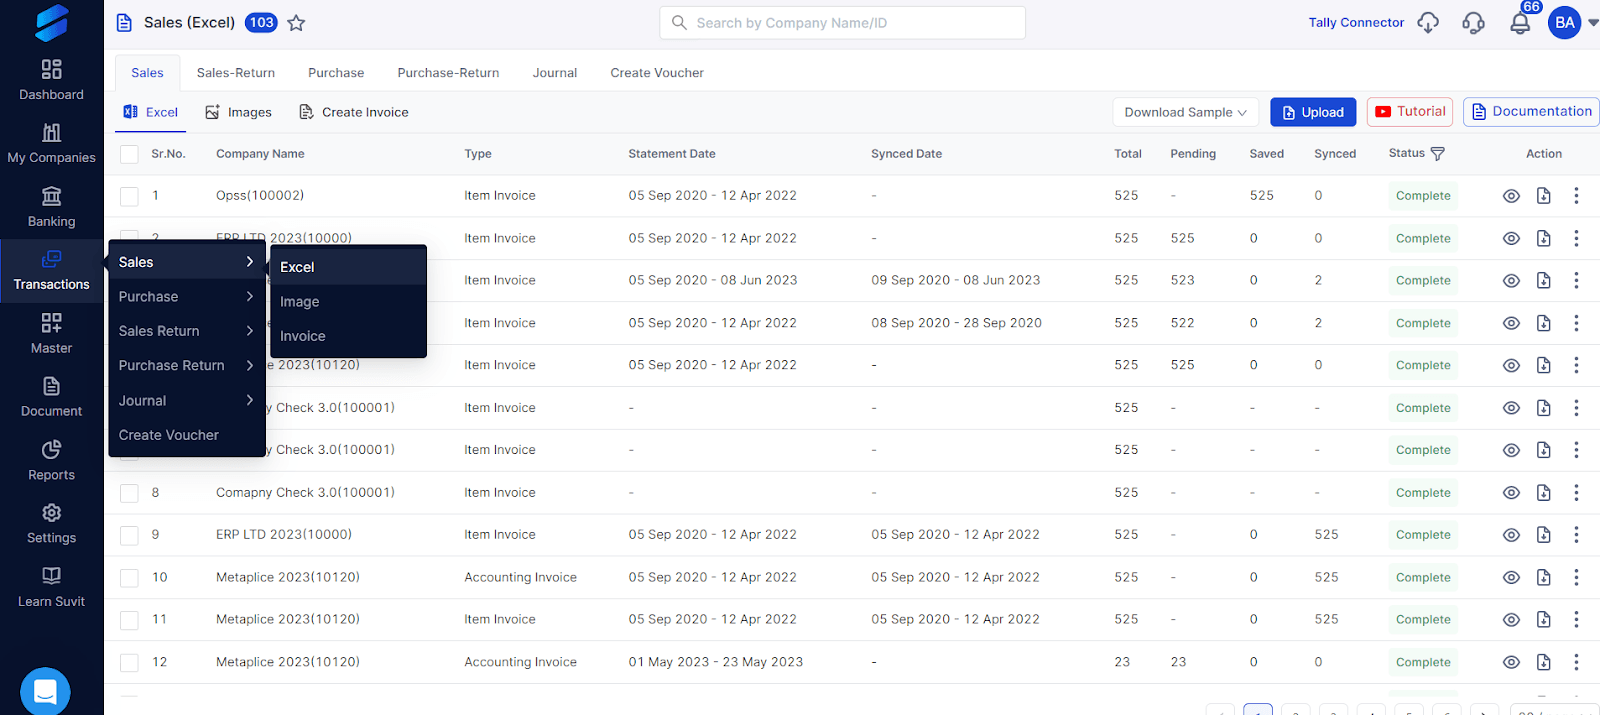
Vyapar TaxOne simplifies things further by offering different modules for various types of data – be it Banking, Sales, or Purchase. Depending on what kind of data you're migrating, select the relevant module in Vyapar TaxOne.
Step 6: Upload the Excel/PDF File
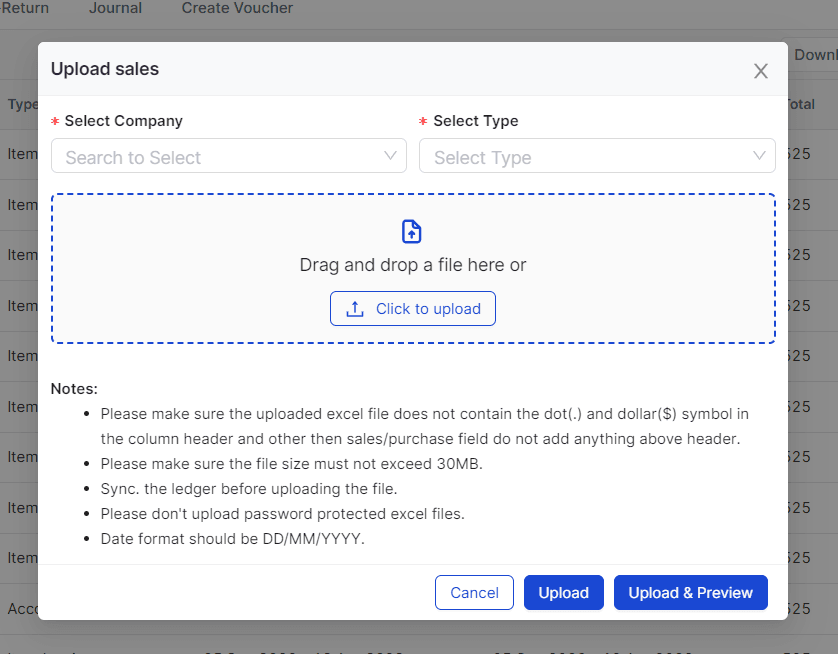
Now comes the exciting part – uploading your Excel or PDF file containing the data you exported earlier. Vyapar TaxOne's clever algorithms will swiftly recognize the data, getting it prepped for Tally import.
Go to the ‘Transactions’ tab from the left-hand side menu and select the category where you want to upload your Excel file.
Click on the ‘Upload’ button on the top right and then upload your Excel file.
Step 7: Send Transactions to Tally
Ready to transfer? Once you've ensured the accuracy of your data within Vyapar TaxOne, hit the "Send Transactions to Tally" button on the top-right corner of the page. Like magic, Vyapar TaxOne takes over, automating the data entry process. Your data flows into Tally with 100% accuracy and reliability.
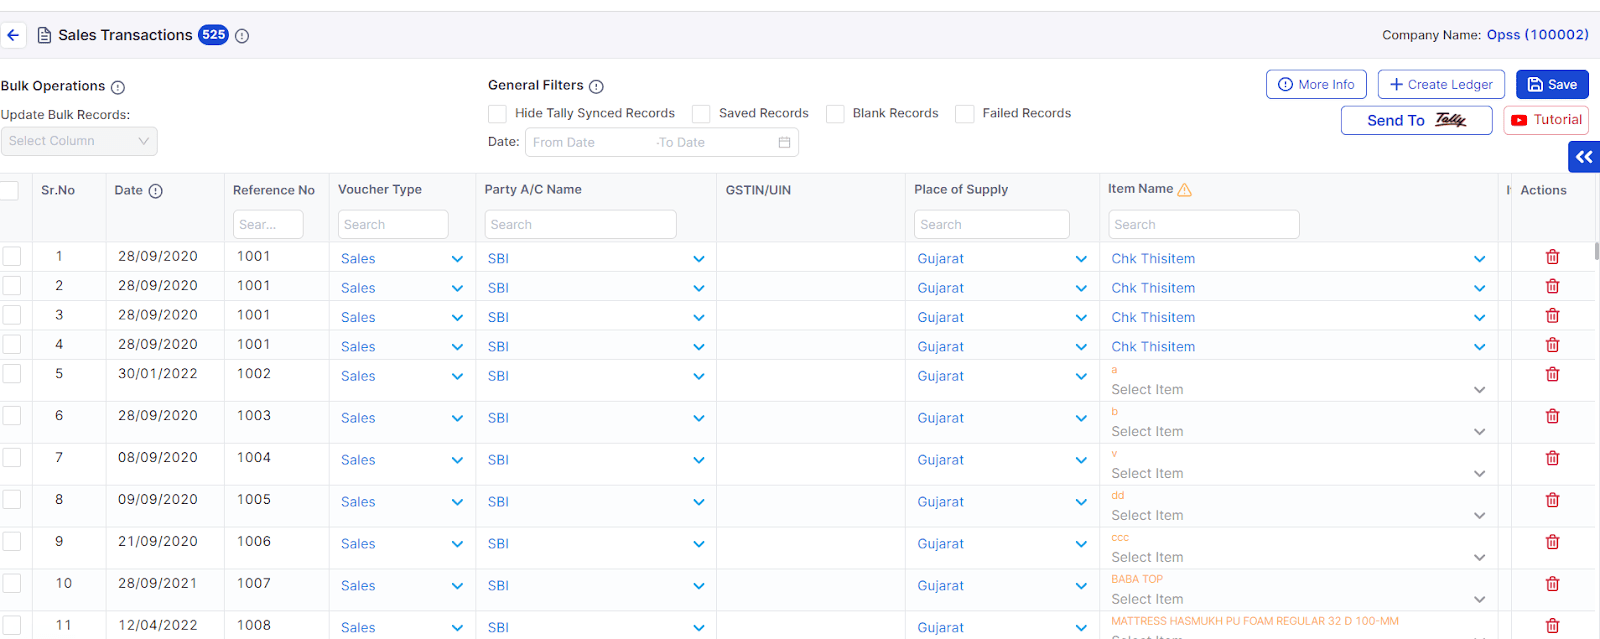
Isn’t that super easy?
Apart from transferring your Excel data to Tally, you can do a lot more with Vyapar TaxOne!
Some of the major benefits of Vyapar TaxOne include:
- Automated Data Migration: Vyapar TaxOne handles the data transfer process from Excel and PDFs to Tally, eliminating the need for manual entry.
- Effortless Data Upload: Easily upload exported files from Excel to Tally using Vyapar TaxOne for seamless migration.
- Error-Free Entries: With AI-powered technology, Vyapar TaxOne ensures accurate and precise data migration, eliminating errors.
- Enhanced Productivity: Vyapar TaxOne's automation frees up time, allowing you to focus on more strategic tasks.
- Anywhere Access: After migration to Tally, your data becomes accessible from any location, enhancing flexibility.
- Various Subscription Plans: Choose from a range of subscription plans that cater to different needs.
- Module Selection: Vyapar TaxOne provides various modules for different types of data, such as Banking, Sales, and Purchase.
- Secure Connection: Vyapar TaxOne establishes a secure connection with Tally to facilitate the data transfer process.
Ready to Give it a TRY?
Download Vyapar TaxOne now and discover the joy of efficient, automated accounting! Say goodbye to tedious manual work and hello to more productivity and client satisfaction!
You can take a free trial and try out Vyapar TaxOne for 7 days, without the need to provide any credit card details. Simply sign up for your account and you’re good to go. 🚀
Q1: Can I import data from formats other than Excel?
A1: Absolutely! Vyapar TaxOne supports data import from PDFs and even scanned PDFs.
Q2: Do I need to change my Excel sheets to import data into Tally?
A2: No, Vyapar TaxOne imports your Excel data as-is, without requiring any sheet changes.
Q3: Does Vyapar TaxOne support XML file import?
A3: No, Vyapar TaxOne does not directly support XML files. Instead, it enables uploading Excel or PDF files and automatically maps the data for seamless import into Tally, eliminating the need to convert Excel files to XML manually.


