


Quickbooks has stopped its services in India from January 2023 and users are looking to migrate their data to another platform.
It was one of the most popular accounting softwares in India and that means thousands of users have to transfer their data to other platforms.
Transferring from Quickbooks to Tally is a natural choice and the best alternative in this case. It is the most dependable and reliable accounting software in India.
This is a step by step guide on how you can migrate your data without making manual entries and saving time on clerical work.
How to transfer data from Quickbooks to Tally
1. Exporting Accounting Masters from QuickBooks
- Go to the Menu bar >>>> click on Reports
- Select List >>>> Select Account Listing
- Click on Excel >>>> Select Create New Worksheet
An excel sheet will be created with your data, but it will be without a customer and suppliers list.
Set the format of the exported master excel sheet as Ledger-Chart-Group.
2. Exporting Customers & Suppliers List
- Go to the Menu bar >>>>click on Reports
- Click on>>>> Customers & Receivables
- Select>>>>Customer contact List
Now, from the Menu bar
- Click >>>>Reports
- Select >>>>Vendors & Payables
- Click >>>>Vendor Contact List
Set the exported Customer or Supplier master as:
Customer- Chart- Grouping- Contact-Phone- Email
You can change the grouping accordingly for customers and suppliers.
3. Exporting Transactions
a. Go to the Menu bar
b. Click >>>>Reports
c. Select>>>> Custom Reports
d. Click >>>> Transaction
e. Select the period from and to
After choosing the period using From and To date, you can choose the columns you require to be exported to excel in the Columns Sections and click on the Filters Tab.
Now,
a. From Choose Filter Tab, Select>>>> Transaction Type
b.Select “Transaction Type” from the drop-down.
c. Press the OK button
d. Go to Transaction details >>>>Click on Excel >>>> Select Create New Worksheet
e. Click >>>> Advanced
Now, go to the Advanced Excel option. Make sure to check and uncheck the QuickBooks Options, Excel Options, and Printing Options according to your export needs.
Click OK and data will be exported to excel.
4. Manual Data Entry in Tally
Once you get your files exported from QuickBooks then you will be required to enter all that data into Tally
- The exported pdfs and .xml needs to be manually entered into Tally
- This will take loads of time and effort
- The process is not error-free and reliable
- Tally does not have the most user-friendly interface
The best way to migrate data from Quickbooks to Tally is via an accounting automation tool
Vyapar TaxOne is an AI-powered accounting automation tool that will migrate data from Quickbooks to Tally successfully eliminating clerical work.
Once you have the files ready after exporting, you can upload the files directly in a few clicks.
The process has multiple benefits
- 100% error free and automated entries
- Access your data from anywhere.
- Increased productivity with time saved
- Powerful accounting features at your fingertips
How to use Vyapar TaxOne for data entry automation?
What otherwise would have been hours of clerical work, Vyapar TaxOne automation has done it in a fraction of the time.
Here's a step-by-step guide on how to use Vyapar TaxOne for data entry automation:
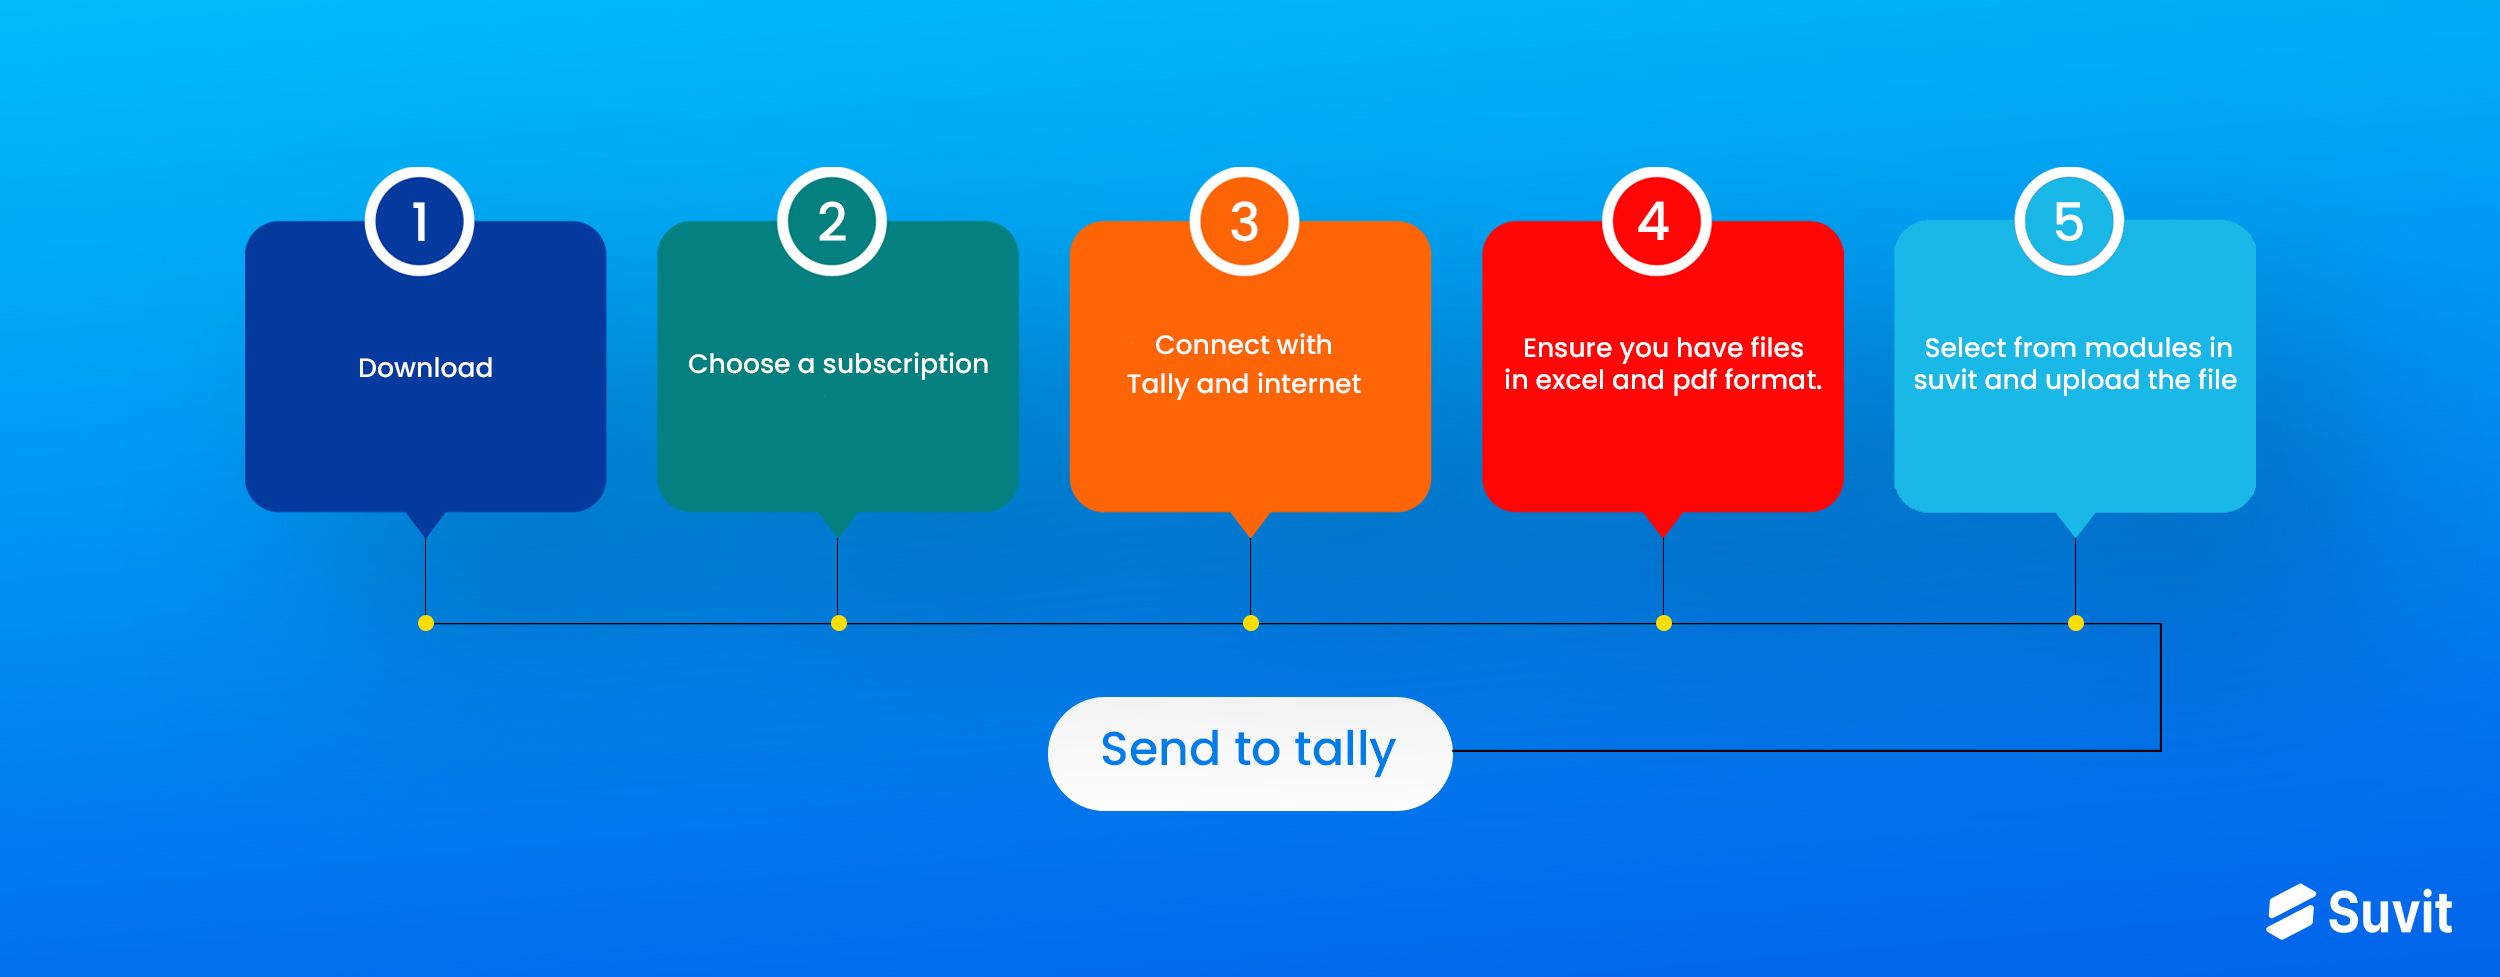
1. Download and Install Vyapar TaxOne:
First, you need to download and install the Vyapar TaxOne application on your computer. You can find the latest version of Vyapar TaxOne on their official website or through a trusted source.
Check out the below video for a quick explanation of how to install Vyapar TaxOne.
2. Choose a Subscription:
Once you have installed Vyapar TaxOne, you'll need to choose a suitable subscription plan that meets your requirements. Vyapar TaxOne offers various subscription options, each with different features and benefits. You can take the free trial to try out its features.
3. Connect with Tally and Internet:
After subscribing to Vyapar TaxOne, you'll need to connect the application with your Tally software. Vyapar TaxOne will establish a secure connection with Tally to facilitate the data transfer process. Also, ensure that your computer has a stable internet connection to avoid any interruptions during the migration process.
4. Prepare Exported Data from QuickBooks:
Before starting the migration process, ensure that you have the data exported from QuickBooks in an Excel or PDF format. This data will serve as the source for importing into Tally using Vyapar TaxOne.
5. Select the Appropriate Module in Vyapar TaxOne:
Vyapar TaxOne offers different modules for various types of data, such as Banking, Sales, or Purchase. Depending on the type of data you want to migrate, choose the appropriate module in Vyapar TaxOne.
6. Upload the Excel/PDF File:
Once you've selected the correct module, you can upload the Excel or PDF file containing the data exported from QuickBooks. Vyapar TaxOne will recognize the data and prepare it for importing into Tally.
7. Send Transactions to Tally:
After verifying the data in Vyapar TaxOne, click on the "Send Transactions to Tally" button. Vyapar TaxOne will automate the data entry process and transfer the data to Tally seamlessly, ensuring 100% accuracy and reliability.
Check out the below video for detailed step-by-step instructions on how to use Vyapar TaxOne:
By using Vyapar TaxOne, you can enjoy numerous benefits, including:
- Eliminating the need for manual data entry: Vyapar TaxOne automates the data transfer process, saving you hours of clerical work.
- Ensuring error-free entries: Vyapar TaxOne's AI-powered technology ensures accurate and precise data migration.
- Increased productivity and time savings: With Vyapar TaxOne's automation, you can focus on more strategic tasks, improving overall efficiency.
- Accessing data from anywhere: Once the data is transferred to Tally, you can access it from anywhere, giving you greater flexibility and convenience.
Final Words
With Vyapar TaxOne, you can revolutionize your accounting processes and experience a host of incredible benefits. No more spending hours on data entry – Vyapar TaxOne's AI-powered automation effortlessly migrates your data from QuickBooks to Tally, ensuring 100% accuracy and reliability.
Don't miss out on this opportunity to simplify your accounting processes and elevate your business to the next level. Take the 7 day free trial of Vyapar TaxOne now and experience the future of accounting today!


