


In the financial world, managing and posting share market transactions efficiently is important for Chartered Accountants in India.
With growing automation tools like Vyapar TaxOne, CAs are better equipped to streamline data entry processes. One such task is posting NJ India Invest share market purchase entries into Tally.
This blog provides a comprehensive guide, outlining practical steps to integrate these entries and ensure seamless accuracy and compliance.
In the realm of accounting, automation is a necessity. For CAs dealing with share market transactions, Vyapar TaxOne offers an efficient way to manage NJ India Invest purchase data and upload it into Tally.
This integration not only minimizes manual errors but also ensures smooth data migration, making the entire process more efficient and time-saving.
In this guide, we’ll walk you through the step-by-step process of uploading purchase entries from NJ India Invest to Tally using Vyapar TaxOne’s automated system, providing you with actionable insights and best practices.
1. Preparing the NJ India Invest Purchase Excel Sheet
Before uploading the purchase data to Vyapar TaxOne, ensure that your Excel sheet is formatted correctly. This step is critical for smooth data processing.
1.1 Remove Unnecessary Data
- Review the data: Eliminate unnecessary rows such as grand totals, footnotes, and irrelevant entries.
- Focus on essential columns: Ensure that only purchase-related data is retained for accurate mapping.
1.2 Add Required Details

- Purchase Ledger: Ensure that a Purchase Ledger column is included with entries such as “Purchase (NJ Investment)” to maintain clear record-keeping.
- Format: Ensure the file is in .xlsx format for compatibility with Vyapar TaxOne.
| Column | Description |
|---|---|
| Purchase Ledger | Purchase entries (e.g., NJ Investment) |
| Order No | Unique order identification |
| Trade Date | Date of purchase |
2. Uploading the Excel Sheet to Vyapar TaxOne
Once your Excel sheet is ready, the next step is to upload the data into Vyapar TaxOne. Here’s how you can do it effectively:
2.1 Access Vyapar TaxOne's Data Entry Automation
- Log in to Vyapar TaxOne: Begin by logging in to your Vyapar TaxOne account.
- Navigate to the Data Entry Automation section and select Purchase. This is where you will upload your purchase sheet.
2.2 Perform Bulk Upload
- Bulk Upload: Once in the purchase section, click on the Bulk Upload button.
- Choose File: Select your prepared Excel sheet and upload it to Vyapar TaxOne for further processing.
3. Configuring Purchase Sheet Settings
Now that you’ve uploaded the file, it’s time to configure the necessary settings to ensure accurate mapping of the purchase entries.
3.1 Enable Necessary Fields
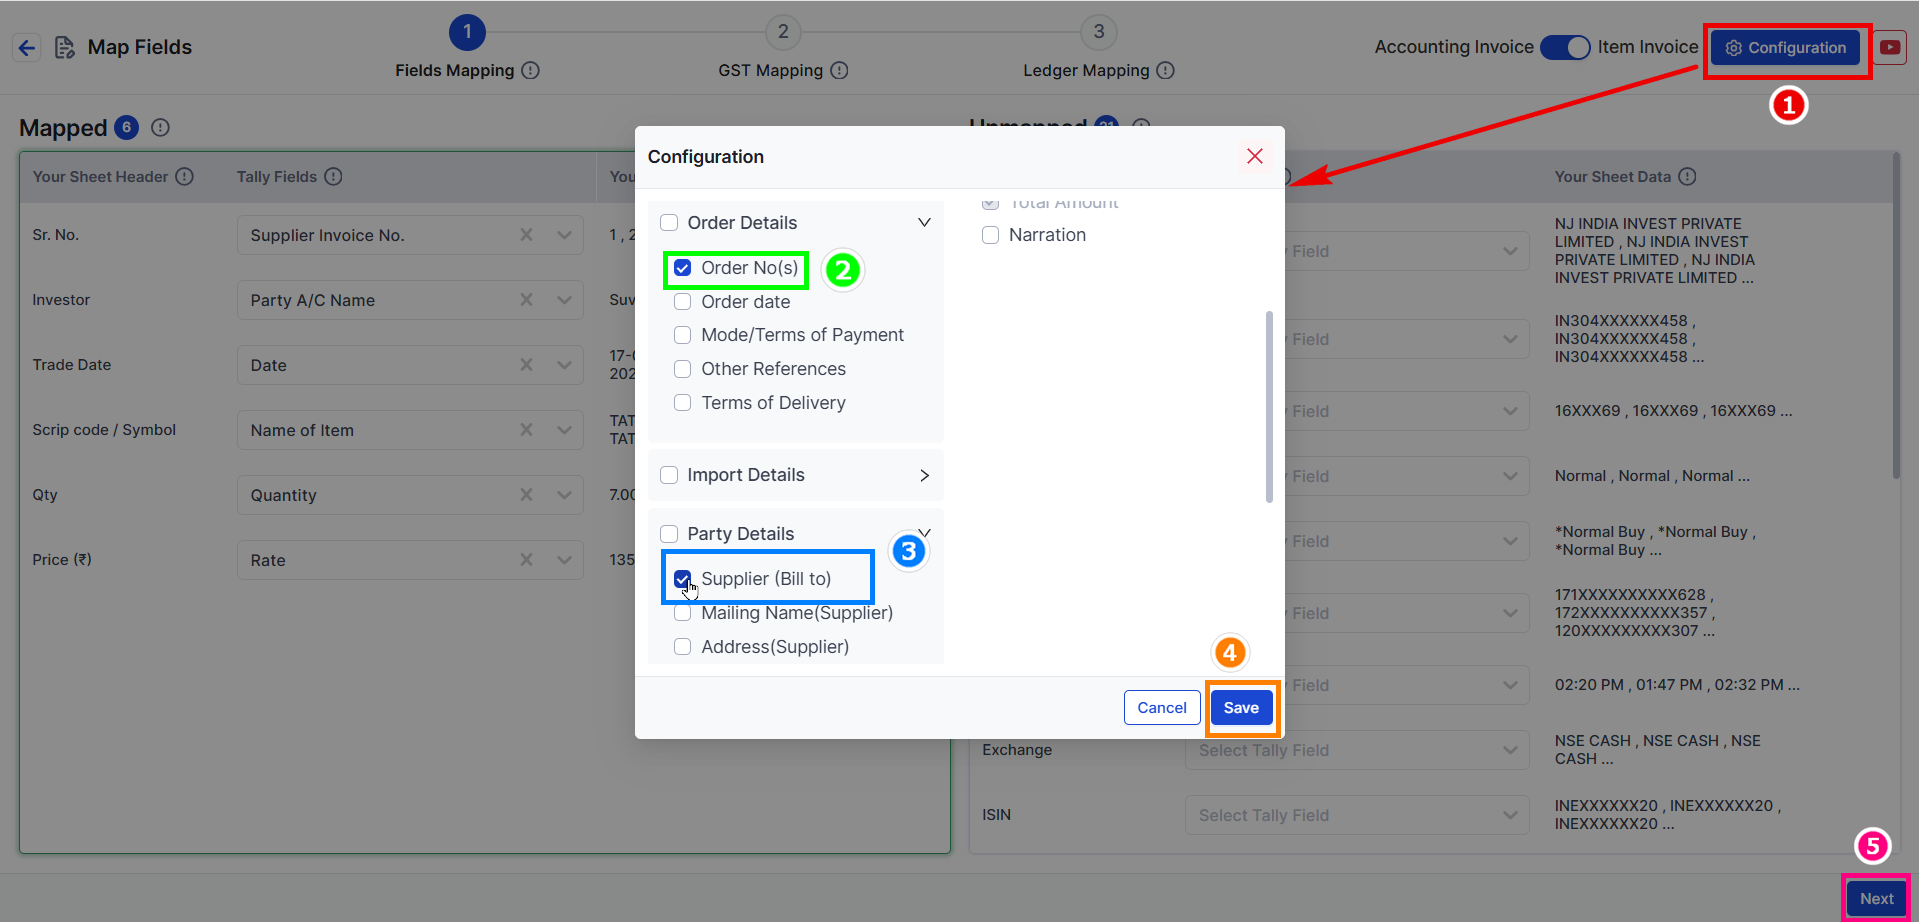
- Order Details: In the Configuration section, enable the Order Number field to capture detailed information about the purchase.
- Party Details: Navigate to Party Details and enable Supplier (Bill To) for seamless mapping between purchase records and supplier details.
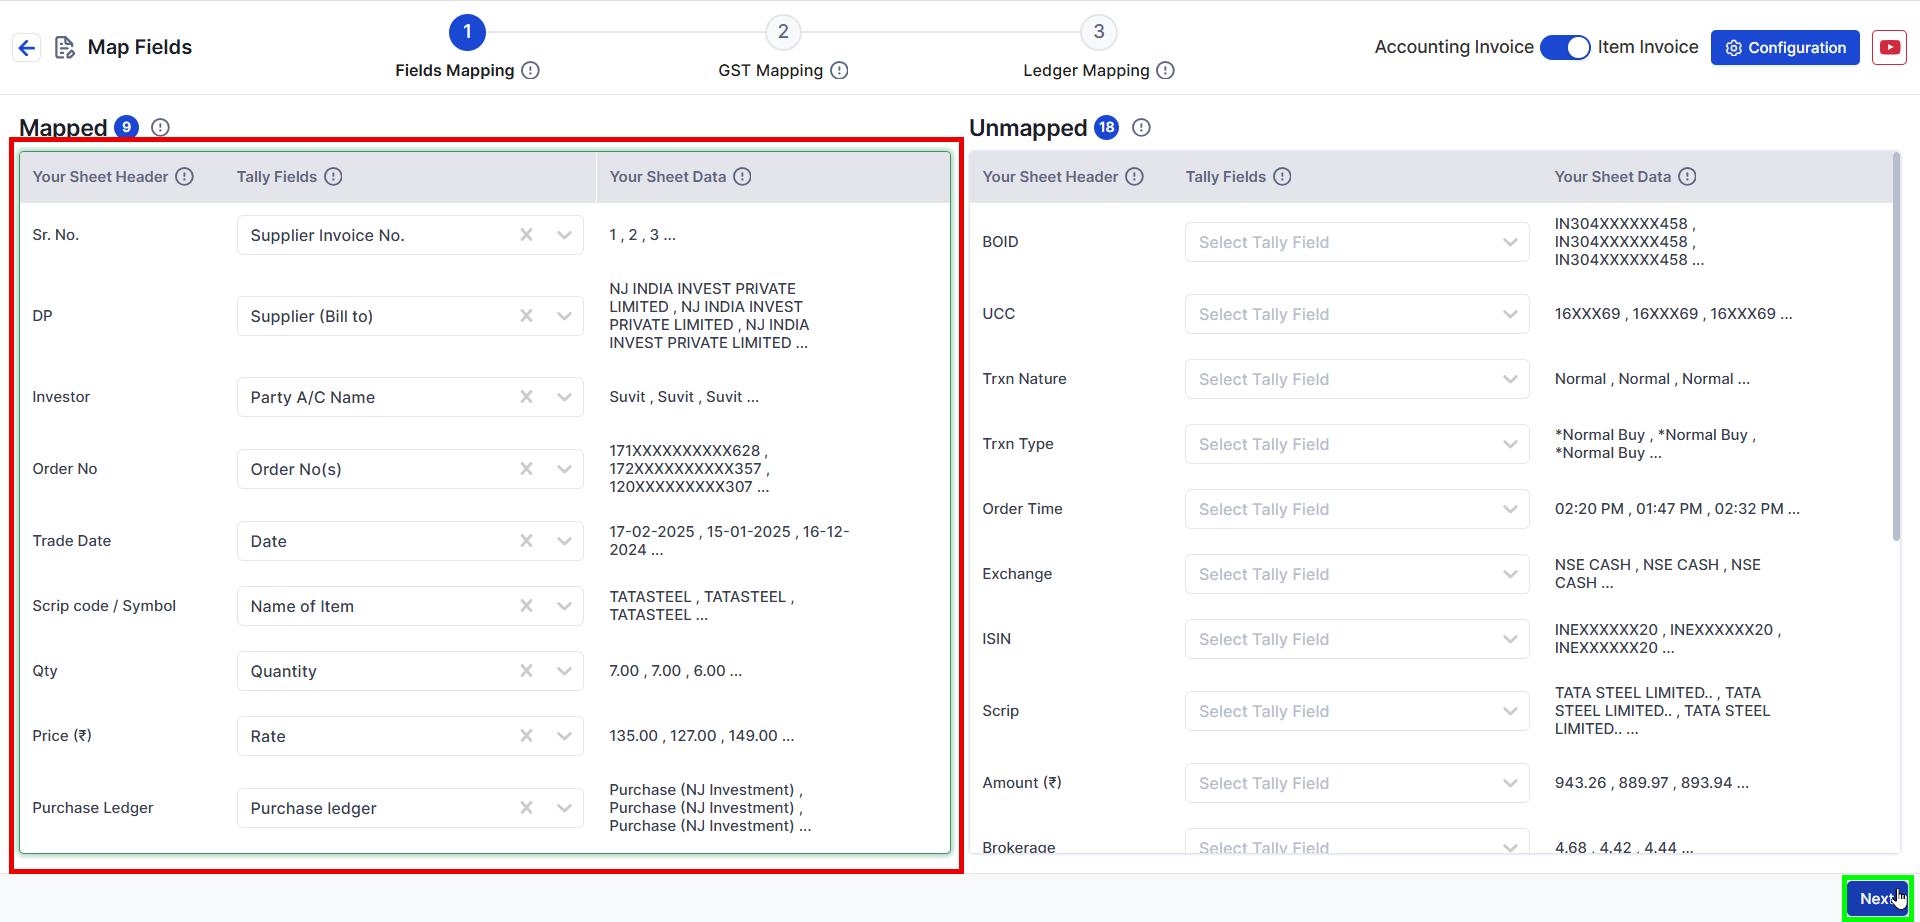
4. Mapping Excel Fields to Vyapar TaxOne Columns
Accurate field mapping between your Excel sheet and Vyapar TaxOne’s columns is crucial to ensure data consistency. Below is a table that outlines the mapping process.
4.1 Field Mapping Overview
| Excel Sheet Heading | Vyapar TaxOne Mapped Column |
|---|---|
| Sr. No. | Supplier Invoice No |
| DP | Supplier (Bill to) |
| Investor Party A/C | Name of Item |
| Order No | Order No(s) |
| Trade Date | Date |
| Scrip code / Symbol | Quantity |
| Qty | Rate |
| Price (₹) | Purchase Ledger |
4.2 GST Mapping
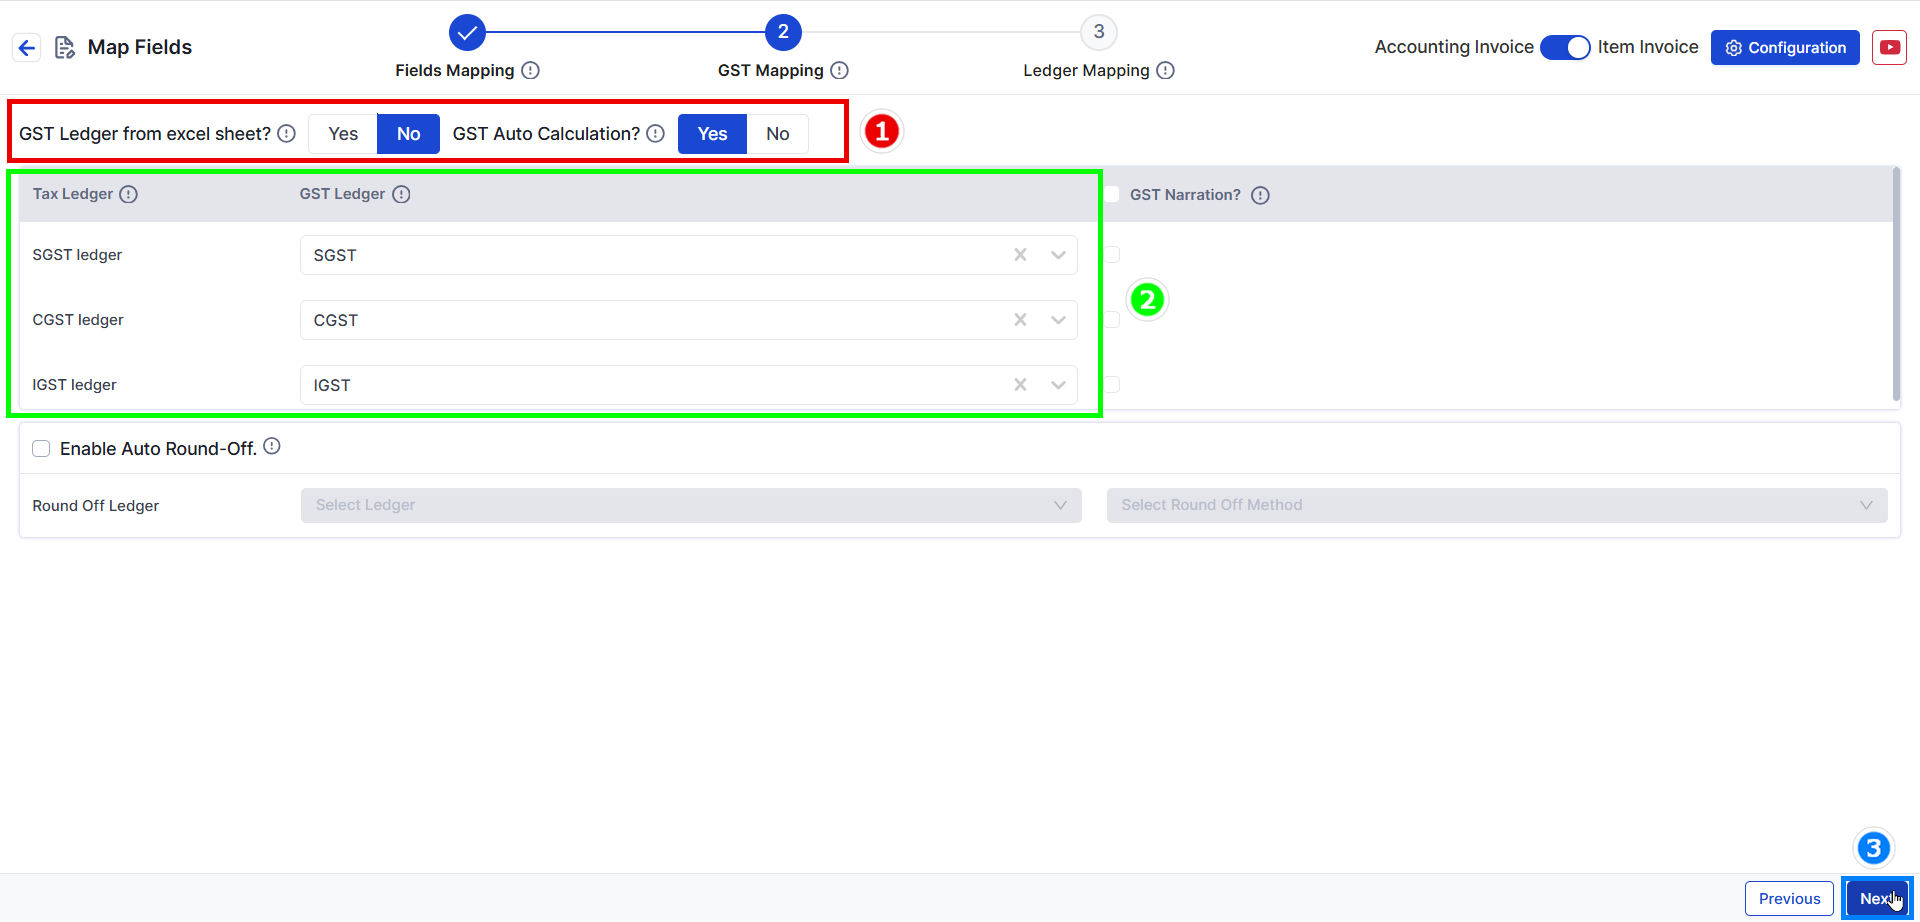
- Verify GST Mapping: Ensure that GST rates, duties, and taxes are mapped accurately between your purchase data and Vyapar TaxOne to comply with tax regulations.
- Adjust as Necessary: Modify settings as needed to ensure the proper categorization of taxes in Vyapar TaxOne.
4.3 Ledger Mapping
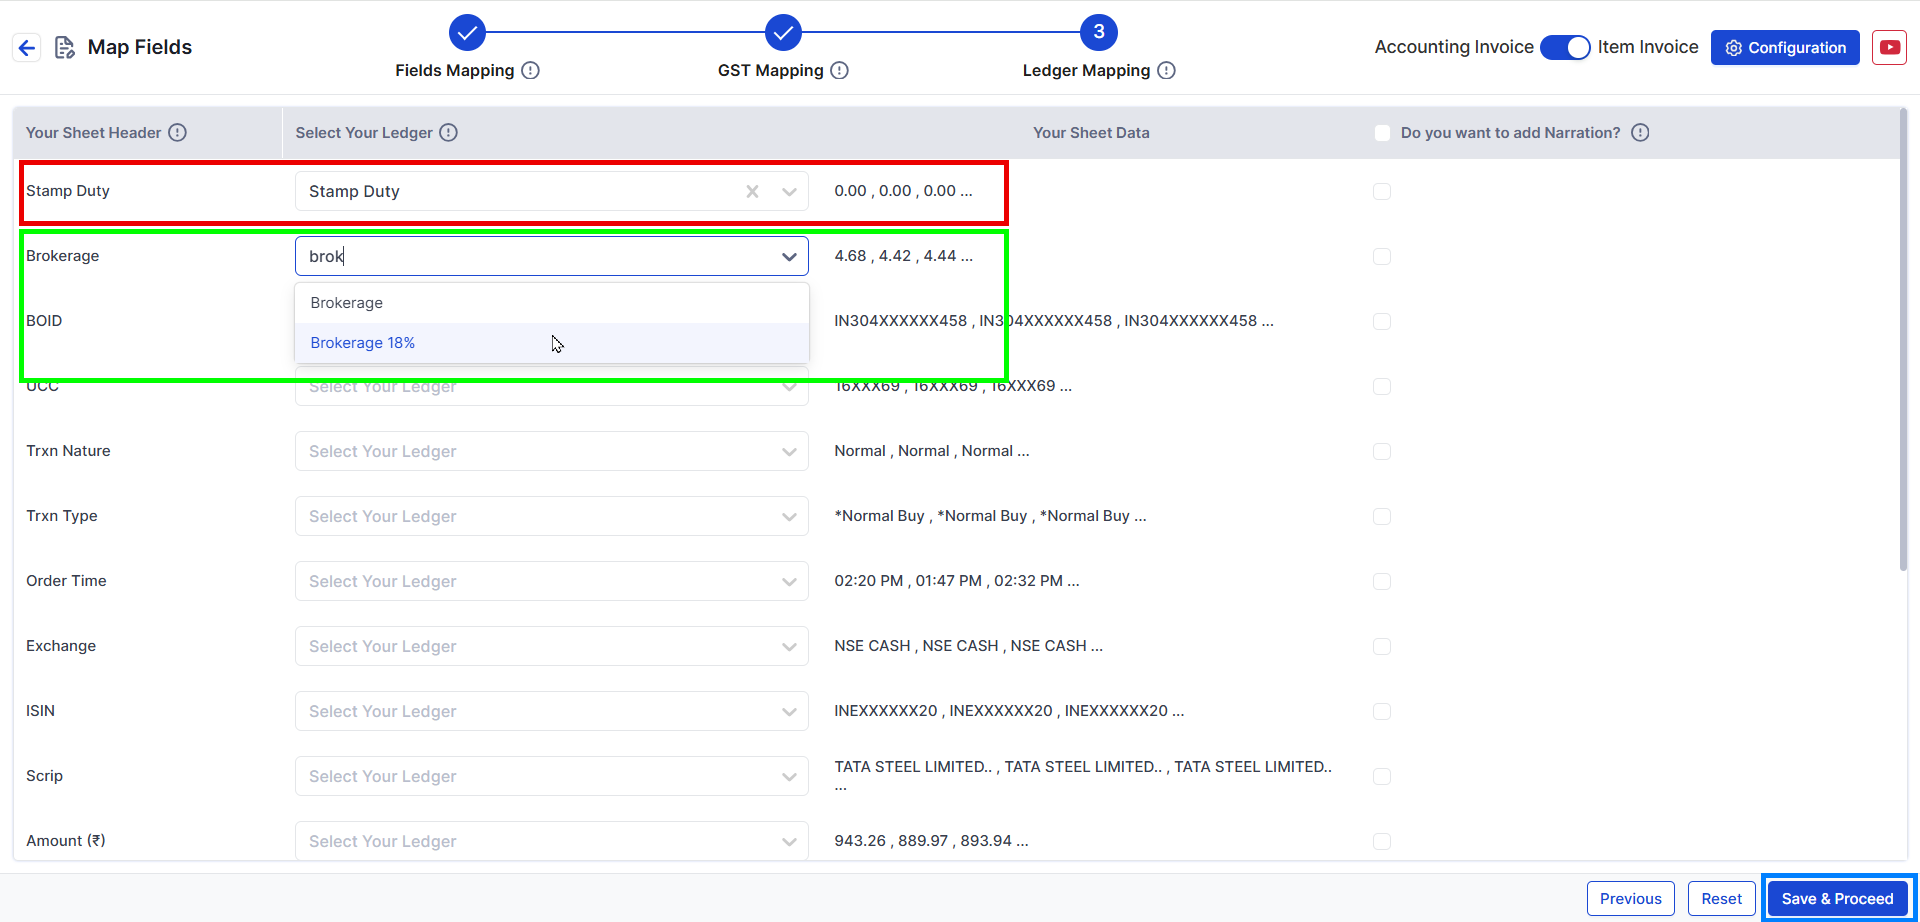
- Mapping Additional Charges: Include charges such as Stamp Duty or Brokerage in the ledger mapping to ensure a complete entry. For example, the map Brokerage is 18% under brokerage charges.
5. Transferring Data to Tally
Once the mapping is complete, it’s time to transfer the data into Tally. Follow these steps for a successful data transfer.
5.1 Save and Review Entries
- Save the Data: After completing the mapping, save the entries in Vyapar TaxOne.
- Review Entries: Before sending the data to Tally, double-check that all entries are accurate and error-free.
5.2 Send Data to Tally
- Transfer to Tally: Click on the Send to Tally button to transfer your data.
- Connector Activation: Ensure that the Tally connector is active during the transfer process for seamless integration.
6. Post-Transfer Actions in Tally
After transferring data to Tally, it’s important to verify that everything has been posted correctly.
6.1 Verify Entries in Tally
- Log in to Tally: Access the Tally dashboard and navigate to the relevant purchase ledger.
- Check Data Accuracy: Verify that all purchase entries are correctly reflected, including the stock purchase ledger and associated charges.
6.2 Address Any Discrepancies
- Error Checking: If discrepancies are identified, revisit your mapping configurations in Vyapar TaxOne to ensure everything is aligned correctly.
- Resend Data: If needed, make necessary adjustments and resend the data to Tally for accurate posting.
7. Best Practices for Efficient Integration
To streamline future entries and minimize errors, follow these best practices:
- Update Excel Templates Regularly: Ensure your Excel templates are up-to-date with Vyapar TaxOne’s latest format requirements for smooth integration.
- Leverage Auto-Mapping: Use Vyapar TaxOne’s auto-mapping feature to save time and improve accuracy.
- Maintain Consistent Naming: Align naming conventions between Vyapar TaxOne and Tally to reduce mapping errors.
| Best Practice | Actionable Tip |
|---|---|
| Update Excel Templates Regularly | Ensure Excel sheet matches the latest Vyapar TaxOne template format |
| Leverage Auto-Mapping | Use Vyapar TaxOne’s auto-mapping feature to speed up the process |
| Consistent Naming Conventions | Ensure similar ledger names across platforms for accuracy |
Optimizing NJ India Invest Entries in Tally
By following this step-by-step guide, Chartered Accountants can streamline the process of posting NJ India Invest share market purchase entries into Tally. With the help of Vyapar TaxOne, this task becomes much easier and error-free, enabling a more efficient workflow and improved compliance with accounting standards.
The integration of automation tools like Vyapar TaxOne into the accounting process not only saves time but also ensures that the financial records are accurate and up-to-date.
By implementing these practices, CAs can stay ahead in the industry and focus more on strategic tasks rather than manual data entry.
FAQs
How do I upload the NJ India Invest purchase sheet to Vyapar TaxOne?
Log in to Vyapar TaxOne, navigate to the Data Entry Automation section, and use the Bulk Upload feature to upload your Excel sheet.
Can I transfer multiple purchase entries to Tally at once?
Yes, Vyapar TaxOne allows you to bulk upload and transfer multiple purchase entries from NJ India Invest to Tally in a single process.
What should I do if discrepancies occur after transferring to Tally?
Review the mapping settings in Vyapar TaxOne, correct any errors, and resend the data to Tally for accurate posting.
Do I need to map every field in Vyapar TaxOne manually?
Vyapar TaxOne offers an auto-mapping feature that can automatically map most fields, saving you time and effort.


