


Do you use Excel and Tally for your accounting needs? Do you want to sync your data between the two platforms without any hassle? If so, you’re in luck. In this blog post, we will show you how to use SUVIT, a powerful AI tool that helps you sync your Excel data with Tally in minutes.
SUVIT is a cloud-based solution that connects your Excel and Tally systems seamlessly. It allows you to upload, map, and process your Excel data and sync it with Tally in a few simple steps. You can also use SUVIT to create new party names and stock items, upload bank statements, manage sales and purchase transactions, and generate reports and audits.
One of the most amazing features of SUVIT is auto-mapping. Auto mapping is a feature that automatically suggests field mappings based on keywords and AI intelligence. This means you don’t have to map everything manually, saving you time and effort. Once you’ve mapped a file, the system will remember your mappings for future uploads.
In this blog post, we will show you how to use automapping in SUVIT to sync your Excel data with Tally. We will also show you how to modify and map your Excel sheet for multiple GST rates and multiple Tally tax ledgers. Let’s get started!
How to Use Auto Mapping in SUVIT
Auto mapping in SUVIT is a feature that simplifies the process of mapping data from your Excel sheets into the system. It makes mapping easier by automatically suggesting field mappings based on keywords and AI intelligence. To use automapping in SUVIT, follow these steps:
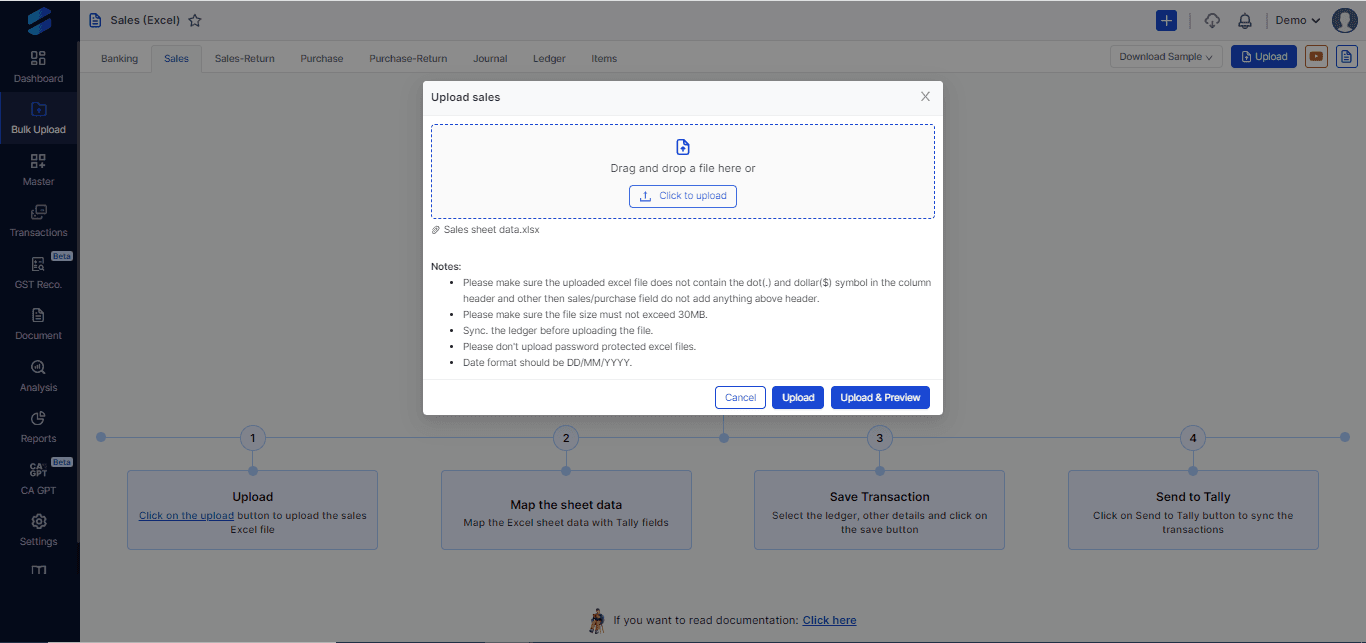
Step 1: Upload your Excel file to SUVIT
You can upload any Excel file that contains your sales, purchase, or journal data. You can also use the sample templates provided by SUVIT to create your Excel file.
To upload your Excel file, click on the Upload File button and select your file from your device. Then, click on the Upload button to upload your file to the system.
Step 2: Map your Excel data to Tally fields.
Once you’ve uploaded your file, click on the Complete button to go to the mapping screen.
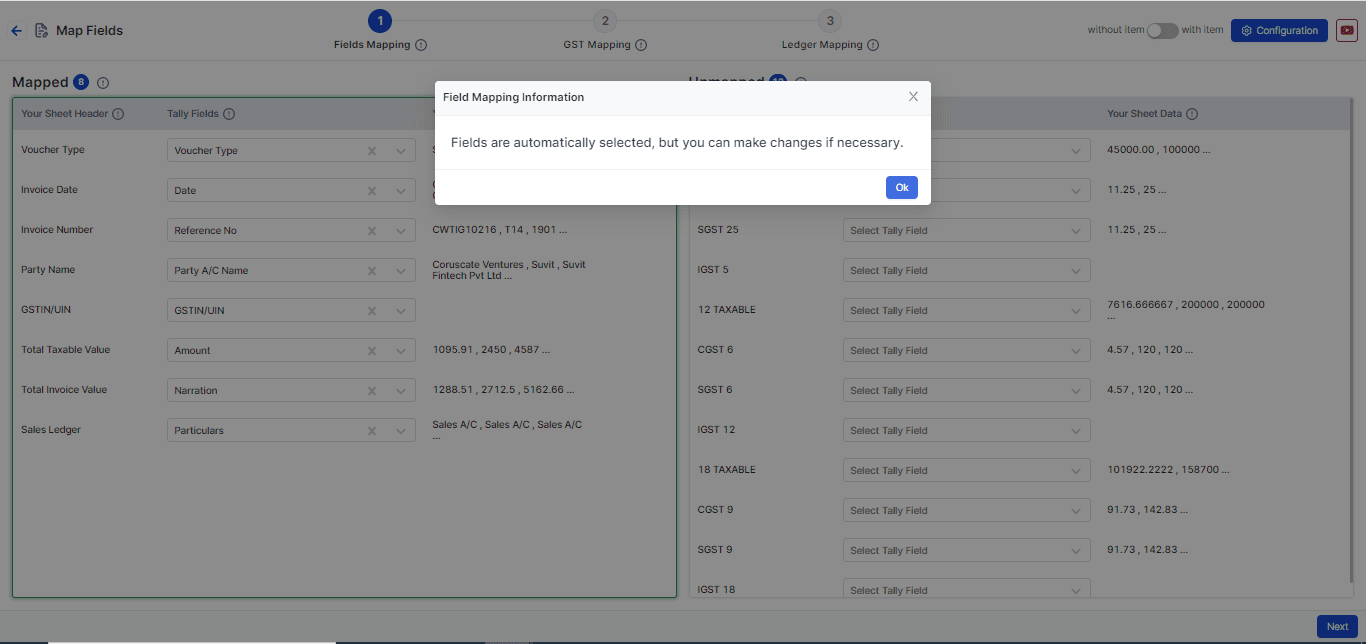
Here, you’ll see the following sections:

Note: You have the option to choose "with item" or "without item" for your data.
- Mapped: Here, you can see the fields that have already been automatically mapped based on the uploaded data.
- Tally Fields: These are the fields that have already been matched with your Tally system. If you believe there are errors or need changes, you can adjust them here.
- Your Sheet Data: This section shows you the top 3 values from your Excel sheet data.
- Unmapped: In this section, you can see the fields that were not automatically mapped, and you’ll need to manually select Tally fields for mapping. Once you’ve mapped these fields, they will move to the “Mapped” section.
Step 3: Map additional fields and ledgers.
In this step, you can map additional fields such as round-off, discount, freight amount, etc., by selecting the appropriate file header and ledger.
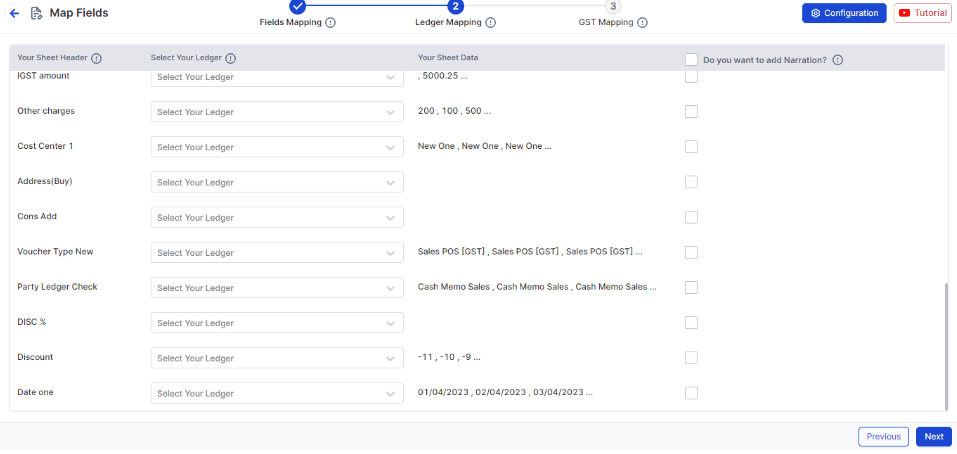
You can also map GST fields and ledgers by selecting the GST ledger from the Excel sheet or the Tally system.
This step will automatically map fields that you have previously mapped for other files.
GST Ledger from Excel sheet? Choose the Tally Tax ledger to display the data if it is set to No.
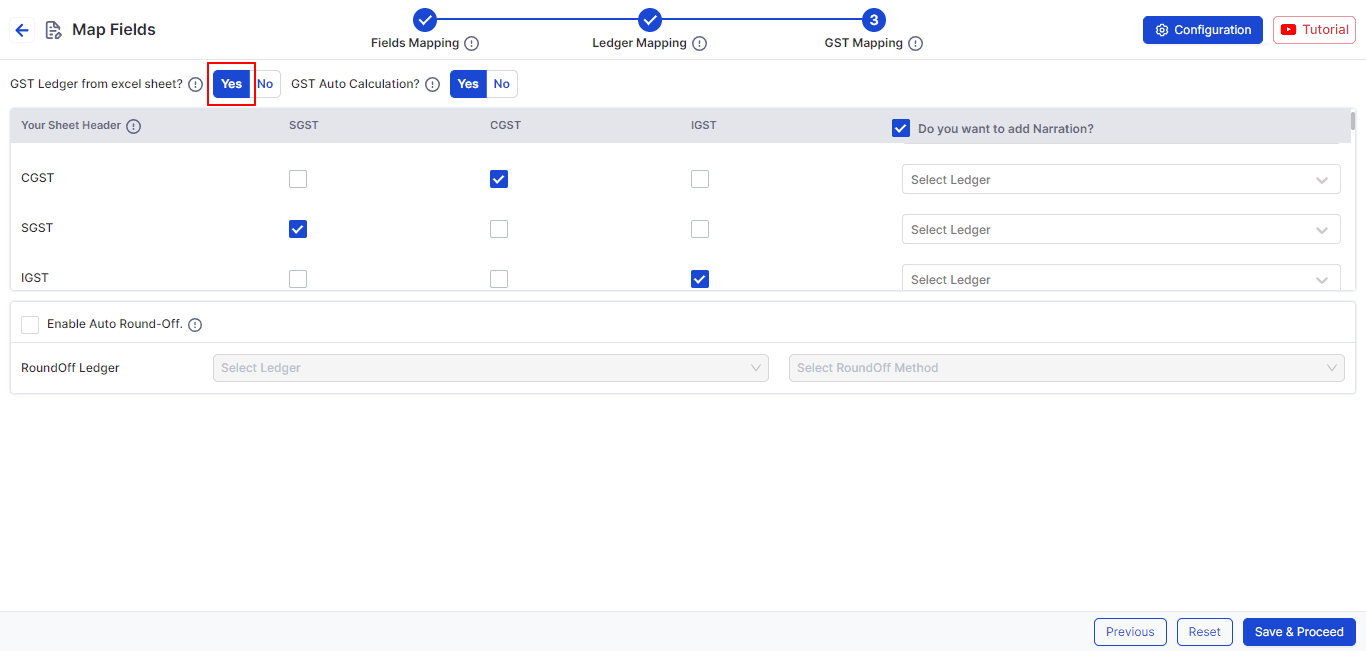
Create a Tax Ledger column for each of the three Tax Ledgers by mapping the Tax Ledger from the sheet if the setting is set to Yes.
GST Auto Calculation?
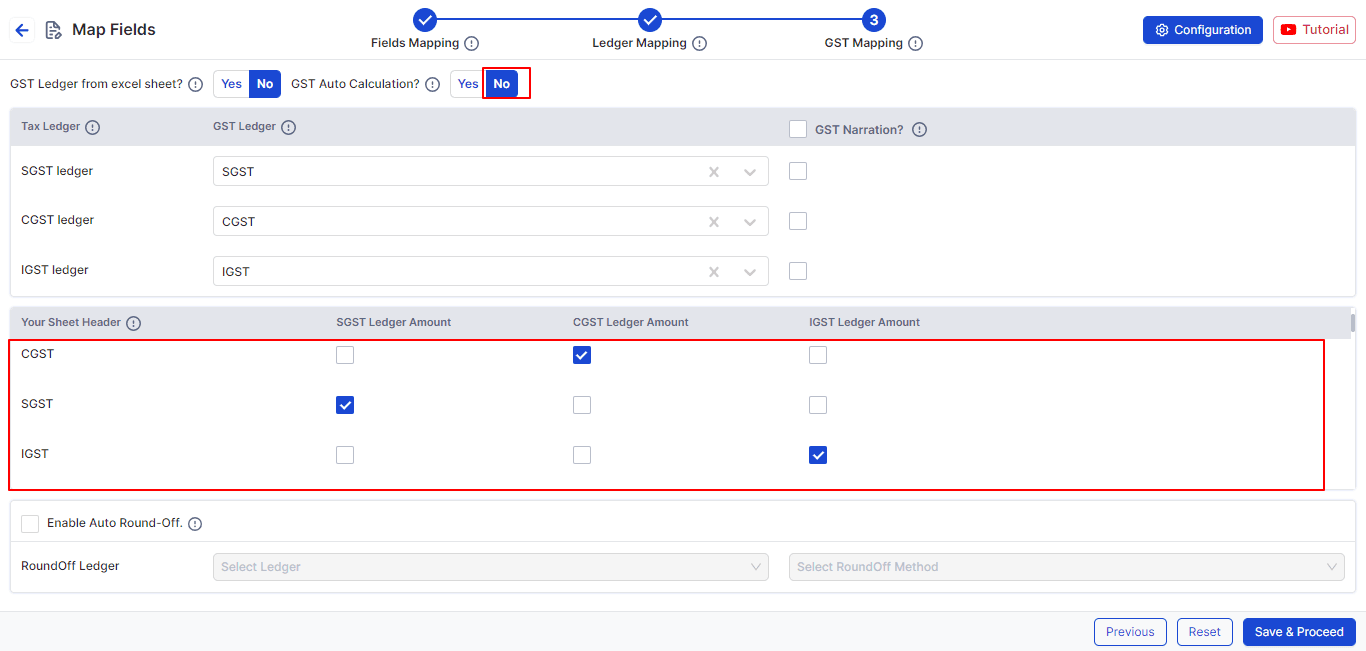
SGST, CGST, and IGST will be calculated automatically if this option is selected.
The Tax will be computed using the Excel sheet if it is set to No. You have the option to add narration and verify the Excel amount with the applicable GST.
Step 4: Save and proceed.
Once you’ve mapped all the fields and ledgers, click on the Save & Proceed button to go to the process screen.
Here, you can review your data and make any changes if needed. You can also filter, sort, and search your data by various criteria. Once you’re satisfied with your data, click on the Send to Tally button to sync your data with Tally.
That’s it! You’ve successfully used automapping in SUVIT to sync your Excel data with Tally. You can also use the same steps to sync your purchase and journal data with Tally.
How to Modify and Map Your Excel Sheet for Multiple GST Rates and Multiple Tally Tax Ledgers
If you have an Excel sheet that contains data with multiple GST rates and multiple Tally tax ledgers, you can also use SUVIT to sync it with Tally. However, you’ll need to modify your Excel sheet and map it accordingly. Here’s how to do it:
Step 1: Modify your Excel sheet.
Depending on the format of your Excel sheet, you’ll need to modify it to make it compatible with SUVIT.
There are two possible formats: vertical and horizontal.
Vertical format: In this format, your Excel sheet has one row for each item and one column for each GST rate. For example:
| Item Name | Rate | Amount | SGST 9% | CGST 9% | IGST 18% |
|---|---|---|---|---|---|
| A | 18 | 1000 | 90 | 90 | 180 |
| B | 18 | 2000 | 180 | 180 | 360 |
To modify this format, you need to create a column with the heading Sales or Purchase Ledger, which will act as Particulars.
You also need to create columns with the headings SGST Name, CGST Name, and IGST Name.
Then, you need to use the filter function in your Excel sheet to assign the appropriate ledger names for each GST rate.
For example:
| Item Name | Rate | Amount | SGST 9% | CGST 9% | IGST 18% | Sales Ledger | SGST Name | CGST Name | IGST Name |
|---|---|---|---|---|---|---|---|---|---|
| A | 18 | 1000 | 90 | 90 | 180 | Sales @ 18% | SGST @ 9% | CGST @ 9% | IGST @ 18% |
| B | 18 | 2000 | 180 | 180 | 360 | Sales @ 18% | SGST @ 9% | CGST @ 9% | IGST @ 18% |
Horizontal format: In this format, your Excel sheet has one row for each item and multiple columns for each GST rate.
For example:
| Item Name | Rate | Amount | SGST | CGST | IGST | SGST 6% | CGST 6% | IGST 12% | SGST 9% | CGST 9% | IGST 18% |
|---|---|---|---|---|---|---|---|---|---|---|---|
| A | 18 | 1000 | 0 | 0 | 0 | 0 | 0 | 0 | 90 | 90 | 180 |
| B | 12 | 2000 | 0 | 0 | 0 | 120 | 120 | 240 | 0 | 0 | 0 |
To modify this format, you need to create a column with the heading Sales or Purchase Ledger, which will act as Particulars.
You also need to create columns with the headings SGST Name, CGST Name, and IGST Name. Then, you need to assign the appropriate ledger names for each GST rate.
For example:
| Item Name | Rate | Amount | SGST | CGST | IGST | SGST 6% | CGST 6% | IGST 12% | SGST 9% | CGST 9% | IGST 18% | Sales Ledger | SGST Name | CGST Name | IGST Name |
|---|---|---|---|---|---|---|---|---|---|---|---|---|---|---|---|
| A | 18 | 1000 | 0 | 0 | 0 | 0 | 0 | 0 | 90 | 90 | 180 | Sales @ 18% | SGST @ 9% | CGST @ 9% | IGST @ 18% |
| B | 12 | 2000 | 0 | 0 | 0 | 120 | 120 | 240 | 0 | 0 | 0 | Sales @ 12% | SGST @ 6% | CGST @ 6% | IGST @ 12% |
Step 2: Upload and map your Excel sheet.
Once you’ve modified your Excel sheet, you can upload it to SUVIT and map it to Tally fields and ledgers.
The steps are similar to the auto-mapping feature, except for the GST mapping and ledger mapping sections. Here, you need to select “Yes” for the GST Ledger from the Excel sheet option, and then map the tax ledger from the sheet, creating a tax ledger column for all three tax ledgers.
You also need to map the other sales or purchase ledgers in the ledger mapping section.
For example:
GST mapping:
| GST Ledger from Excel sheet? | Yes |
|---|---|
| SGST | SGST Name |
| CGST | CGST Name |
| IGST | IGST Name |
Ledger mapping:
| Your Sheet Header | Select Ledger |
|---|---|
| Select Ledger | Sales Ledger |
| SGST @ 9% | SGST @ 9% |
| CGST @ 9% | CGST @ 9% |
| IGST @ 18% | IGST @ 18% |
| SGST @ 6% | SGST @ 6% |
| CGST @ 6% | CGST @ 6% |
| IGST @ 12% | IGST @ 12% |
Step 3: Save and proceed.
Once you’ve mapped all the fields and ledgers, click on the Save & Proceed button to go to the process screen.
Here, you can review your data and make any changes if needed. You can also filter, sort, and search your data by various criteria. Once you’re satisfied with your data, click on the Send to Tally button to sync your data with Tally.
That’s it! You’ve successfully modified and mapped your Excel sheet for multiple GST rates and multiple Tally tax ledgers.
You can also use the same steps to sync your journal data with Tally.
Also Read: Excel → AI → Tally: End-to-End Workflow with Suvit


